 Save
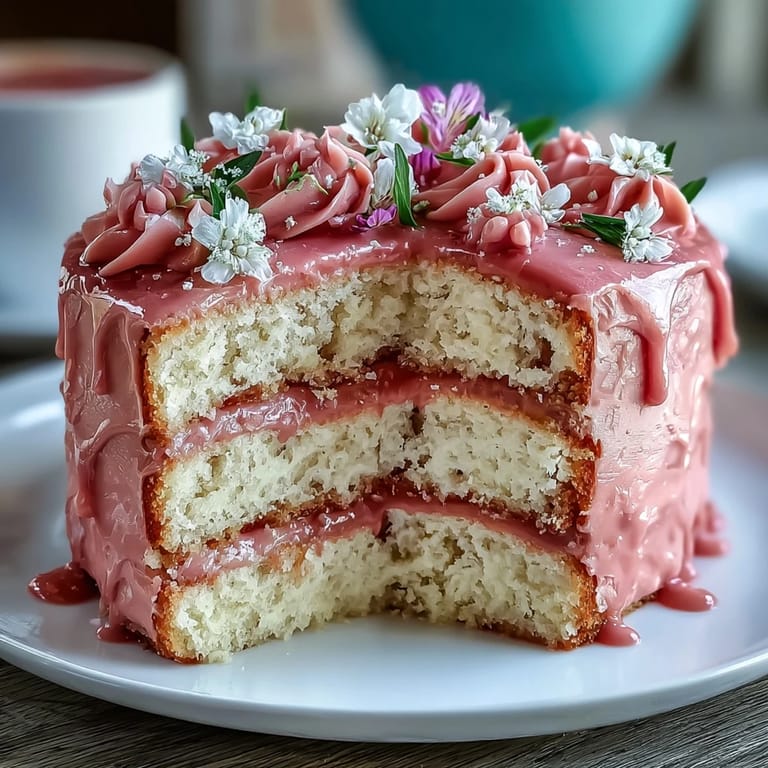
Save My sister called three days before Mother's Day in a panic—she'd promised Mom a homemade cake but had no idea where to start. I found myself at her kitchen table with flour dust settling on my sleeves, sketching out a plan for a three-layer vanilla cake with pink ombre buttercream. There's something about building a cake in layers that feels like you're constructing hope, each one a promise that this will be beautiful and worth the effort. By the time we'd finished frosting and nestled edible flowers across the top, we were both grinning like we'd just pulled off a heist.
What I didn't expect that Mother's Day morning was how quiet the kitchen became once we'd arranged everything on the cake stand. My sister and I just stood there, coffee cooling in our hands, looking at what we'd made together. Mom walked in, gasped, and then did something we didn't anticipate—she asked us to cut into it right then and there so we could all share a slice before anyone else arrived. That cake became less about the occasion and more about the three of us in our flour-covered chaos, laughing at a moment that felt both ordinary and irreplaceable.
Ingredients
- All-purpose flour: Two and a half cups gives you structure without being dense—this is the foundation that keeps your layers tender and light.
- Baking powder: Two and a half teaspoons is the silent worker here, creating the lift that makes each bite airy rather than heavy.
- Unsalted butter: Room temperature is non-negotiable; cold butter won't cream properly and you'll miss out on that fluffy crumb.
- Granulated sugar: Two cups might sound like a lot, but it's what creates that fine, delicate crumb and feeds the yeast action.
- Eggs: Four large ones, also at room temperature—they emulsify better and incorporate air more easily, which is exactly what you want.
- Pure vanilla extract: A tablespoon sounds generous but it's what makes people close their eyes and ask if there's something special in here.
- Whole milk: Room temperature milk creates a tender crumb; cold milk seizes the batter and you lose that silky texture.
- Powdered sugar for buttercream: Five cups sifted means no lumps hiding in your frosting—sifting takes two minutes and changes everything.
- Pink food coloring: Gel is worth seeking out because it won't water down your buttercream the way liquid coloring will, and the shades are more vibrant.
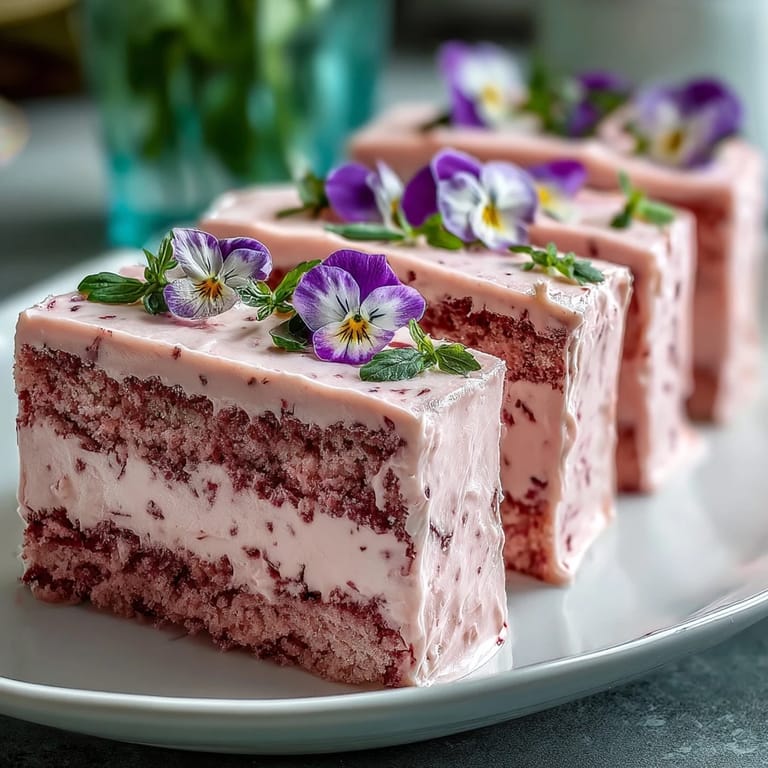
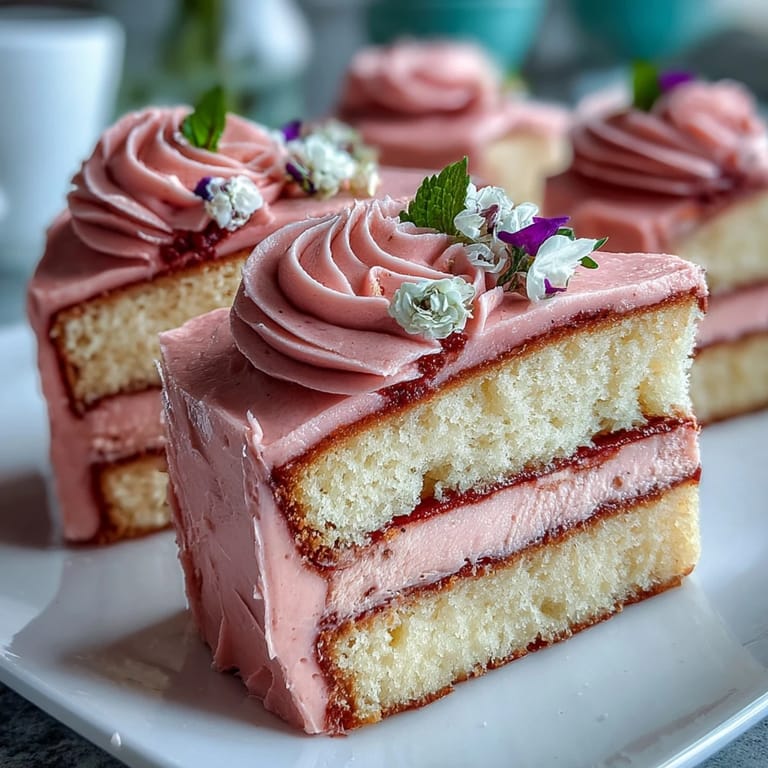
- Edible flowers: Violets, pansies, and rose petals aren't just decoration—they're the final flourish that says someone cared enough to make it beautiful.
Tired of Takeout? 🥡
Get 10 meals you can make faster than delivery arrives. Seriously.
One email. No spam. Unsubscribe anytime.
Instructions
- Set your stage:
- Preheat to 350°F and line three 8-inch pans with parchment—you want the oven already warm and your pans ready so batter goes straight in. This is the moment to gather everything because once you start mixing, you move fast.
- Build your dry base:
- Whisk flour, baking powder, and salt together in a medium bowl—this distributes the leavening evenly so you get consistent rise. It takes ninety seconds and prevents lumps that would ruin your crumb.
- Cream butter and sugar:
- Beat on high for three to four minutes until it's pale and fluffy, almost like clouds—this is where air gets incorporated, and air is what makes cake light. You'll know it's ready when you can barely see the individual sugar granules.
- Add eggs one at a time:
- This is patient work, but each egg needs to fully incorporate before the next one arrives—rushing creates a greasy, broken batter. Mix well after each one, scraping the bowl sides to catch any stragglers.
- Alternate flour and milk:
- Start with flour, then milk, then flour again—ending on flour keeps the batter stable and prevents curdling. Mix on low speed; overmixing at this stage develops gluten and toughens your cake.
- Divide and bake:
- Split batter evenly between pans—I eyeball it because a scale isn't always precise, but even layers bake evenly. Bake for twenty-five to thirty minutes until a toothpick comes out clean, then let them rest in the pans for ten minutes before turning out.
- Prepare the buttercream:
- Beat butter for two to three minutes until it's pale and creamy—this aerates it so it whips up fluffy and light. Gradually add powdered sugar, then milk and vanilla, beating for another three minutes until it's clouds again.
- Create your ombre:
- Divide buttercream into four bowls and tint three with increasing amounts of pink coloring—start light and deepen as you go. The white buttercream is your base for the outside, so reserve plenty.
- Layer and frost:
- Place the first cake on your serving plate, spread the darkest pink on top, then layer and frost with medium pink, then light pink. Coat the sides with white buttercream, then use an offset spatula to smooth everything into place.
- Blend the ombre effect:
- A bench scraper dragged vertically up the sides creates that dreamy blended look—but this step is optional if you prefer distinct color bands. Chill for thirty minutes before slicing so cuts stay clean and neat.
- Add the flowers:
- Decorate with edible flowers or flower toppers just before serving—fresh flowers stay fresher this way and look dewier. Remove any non-edible toppers before anyone takes a bite.
 Save
Save There's a specific moment when you're frosting a layer cake that everything clicks—when you realize you're not just following instructions anymore, you're creating something. My hands steadied as I worked the spatula around the sides, and I stopped thinking about whether it would look right and started feeling whether it felt right. That's when I knew we'd made something worth celebrating.
Why This Cake Works for Mother's Day
Vanilla might sound simple, but it's the flavor that lets everything else shine—the buttercream, the flowers, the moment itself. It's elegant without being fussy, impressive without requiring techniques you can't actually pull off in a home kitchen. I've learned that the best celebration cakes are the ones that taste as good as they look, and this one delivers on both fronts without asking you to be a professional.
The Ombre Effect Explained
Ombre isn't just about color—it's about creating a visual journey from pale to deep that draws the eye upward and makes people lean in closer. Start with your lightest tint on the top layer, medium in the middle, and darkest on the bottom, then use white buttercream on the sides so the colors graduate naturally. If you're nervous about blending, you don't have to; distinct color bands look just as intentional and honestly might be easier to execute.
Storage, Make-Ahead, and Final Touches
You can bake the layers a full day ahead—wrap them in plastic wrap and store at room temperature, then frost the next day when you have fresh energy. Buttercream stays stable for three to four hours at room temperature, so don't stress about timing; frosting in the morning and decorating an hour before serving keeps everything looking fresh. Add edible flowers at the very last moment so they don't wilt or absorb moisture from the buttercream.
- Brush cooled cake layers with simple syrup if you want extra moisture and a subtle sweetness that catches people off guard.
- A sparkling rosé on the side turns this into an actual celebration, not just dessert.
- If fresh edible flowers aren't available, candied violets and store-bought toppers work beautifully—don't let perfection be the enemy of finished.
 Save
Save This cake isn't just about the occasion—it's about showing up in the kitchen and making something that tastes like love tastes, which is warm and a little bit sweet. Every time you make it, you'll find your own rhythm with the frosting and your own way of arranging the flowers, and that's exactly how it should be.
Recipe FAQs
- → How do I create the pink ombre effect in the buttercream?
Divide the buttercream into several bowls and add increasing amounts of pink food coloring to each to create graduated shades. Apply them layer by layer for the ombre effect.
- → What type of flowers can be used for decoration?
Use fresh, edible flowers such as violets, pansies, or rose petals for a safe and beautiful decoration. Always ensure they are pesticide-free and suitable for culinary use.
- → How do I keep the vanilla sponge moist?
Brushing the cooled sponge layers with simple syrup before frosting helps enhance moisture and adds a subtle sweetness.
- → Can I prepare this dessert in advance?
Yes, the sponge and buttercream can be prepared ahead of time. Assemble and chill the finished cake for at least 30 minutes before serving for best results.
- → What tools are essential for assembling this layered cake?
You'll need round cake pans, an electric or stand mixer, mixing bowls, an offset spatula, parchment paper, and optionally a bench scraper for smoothing the buttercream.