 Save
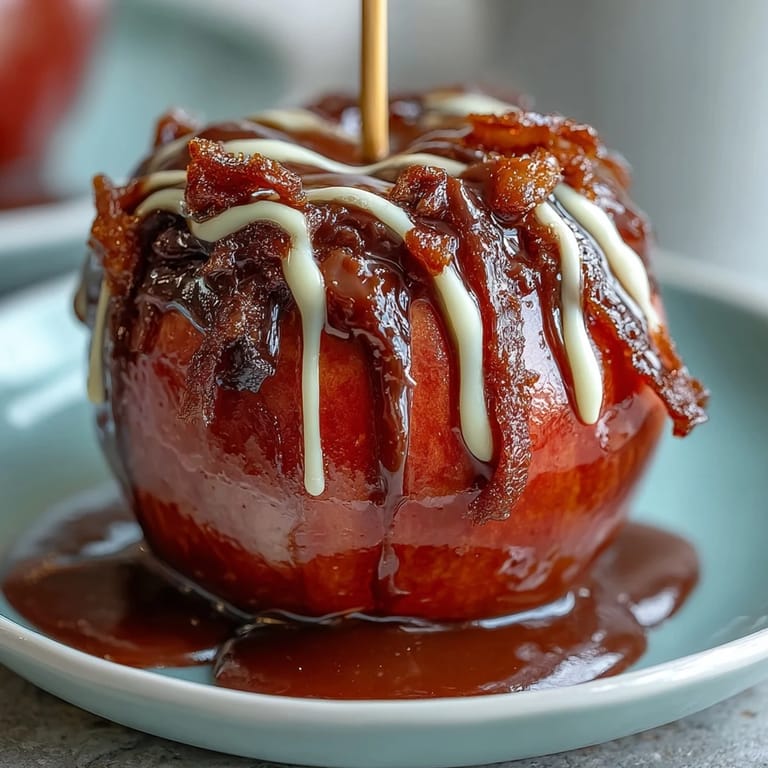
Save My neighbor brought over candy apples one October afternoon, and I watched my kids bite into that crisp red shell like it was the most magical thing they'd ever eaten. The way the candy cracked between their teeth, the tart apple underneath, that unexpected white chocolate drizzle—I was hooked immediately. I started making them that same week, and honestly, there's something about standing over a pot of boiling sugar that feels like real kitchen magic. The thermometer climbing, the color shifting, knowing you're seconds away from that perfect hard crack stage. It's become our thing now, especially when friends drop by.
I made a batch for my daughter's school fundraiser last year, and three moms asked for the recipe right there in the parking lot. One of them admitted she'd been intimidated by candy thermometers her whole life, but watching me dip those apples made her think maybe she could actually do it. That's the thing about this recipe—it looks complicated, but once you get the rhythm down, it's almost meditative.
Ingredients
- 8 small to medium Granny Smith or Gala apples: Granny Smiths are tangier and hold up better to the heat, but Galas give you a sweeter balance if that's your preference, and make sure they're completely dry before you even think about dipping.
- 8 wooden sticks: Craft sticks work fine, though I've found thicker popsicle sticks give a better grip, and inserting them at a slight angle instead of straight down keeps them more stable.
- 2 cups granulated sugar: This is your foundation, and measuring by weight is honestly worth it if you have a scale, because packed sugar versus loose sugar can throw off your candy completely.
- 1/2 cup light corn syrup: This prevents crystallization and keeps your candy coating smooth and glossy, which is why skipping it would be a real mistake.
- 3/4 cup water: Start with this amount, and trust that the ratios matter more than you think when you're dealing with candy.
- 1/2 tsp red gel or liquid food coloring: Gel coloring gives you deeper, richer reds without thinning out the candy like liquid coloring sometimes does, and the difference is noticeable.
- 1/8 tsp cream of tartar: Optional but honestly worth including, because it smooths out the texture and makes the final coating more forgiving.
- 3 oz white chocolate, chopped or chips: Quality matters here since there's no other flavors competing, so pick something you'd actually eat on its own.
- 1 tsp coconut oil or vegetable oil: This keeps your white chocolate from seizing up and makes drizzling way easier, and a little goes a long way.
Tired of Takeout? 🥡
Get 10 meals you can make faster than delivery arrives. Seriously.
One email. No spam. Unsubscribe anytime.
Instructions
- Set up your station like you mean it:
- Line your baking sheet with parchment paper, give it a light grease, and have those apples nearby with sticks ready to insert. Working with hot candy means you need everything within arm's reach, no scrambling mid-dip.
- Insert the sticks carefully:
- Push each stick firmly into the stem end at a slight angle, rotating as you push so it anchors into the fruit without cracking it. If an apple cracks or feels hollow, toss it and grab another—you can't dip a damaged one.
- Combine your candy base:
- In your heavy-bottomed saucepan, stir together sugar, corn syrup, water, and cream of tartar until it looks like wet sand. This gentle stirring dissolves the sugar evenly, which sets you up for smooth, shiny candy.
- Heat without stirring:
- Place the pan over medium heat and clip your candy thermometer to the side, making sure the bulb doesn't touch the bottom. Bring it to a boil and then hands off—stirring now invites crystallization, which ruins everything.
- Add color at exactly 250°F:
- When the thermometer hits 250°F, add your red food coloring and swirl the pan gently to disperse it without stirring. This is the sweet spot where the candy is hot enough to accept the color evenly.
- Push to hard crack stage:
- Keep the heat steady and watch as the temperature climbs toward 300°F, which should take about 5 to 7 minutes total. You'll notice the mixture becomes deeper and more amber-toned, and the smell shifts from sweet to almost caramel-like.
- Dip with confidence and speed:
- The moment it hits 300°F, remove the pan from heat and tilt it slightly so the candy pools on one side. Working quickly, dip each apple, twisting to coat all sides, then let excess drip off and set it on your prepared sheet—hesitation means uneven coating.
- Let the candy set completely:
- Give it at least 10 minutes, untouched, so the coating hardens into that satisfying shell. Patience here pays off; moving apples too early causes them to slide around and stick.
- Melt the white chocolate gently:
- Chop your white chocolate and combine it with the coconut oil in a microwave-safe bowl, then heat in 20-second bursts, stirring between each burst. This slow approach prevents seizing, which turns your drizzle into grainy clumps instead of silky ribbons.
- Drizzle and finish:
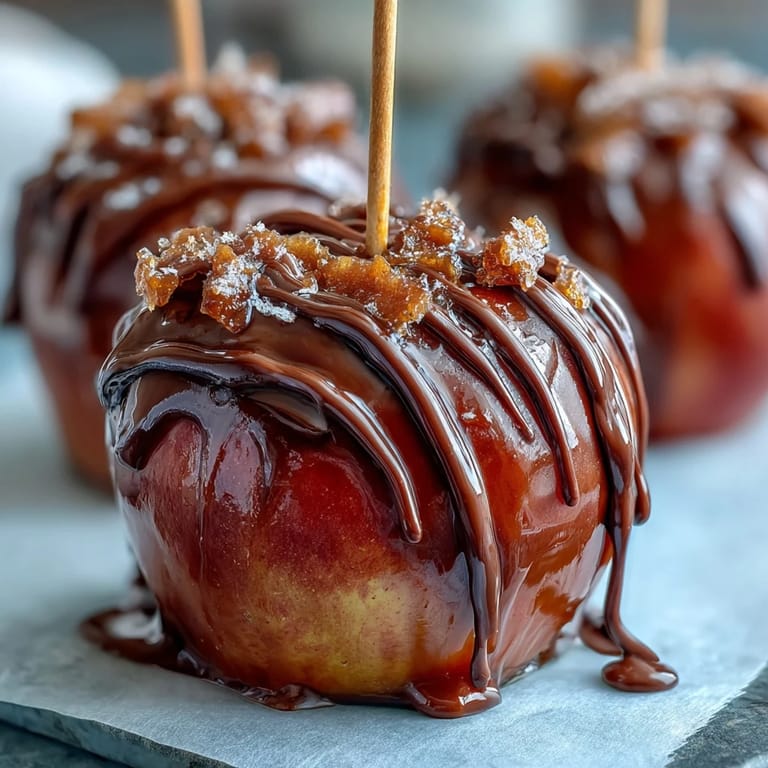
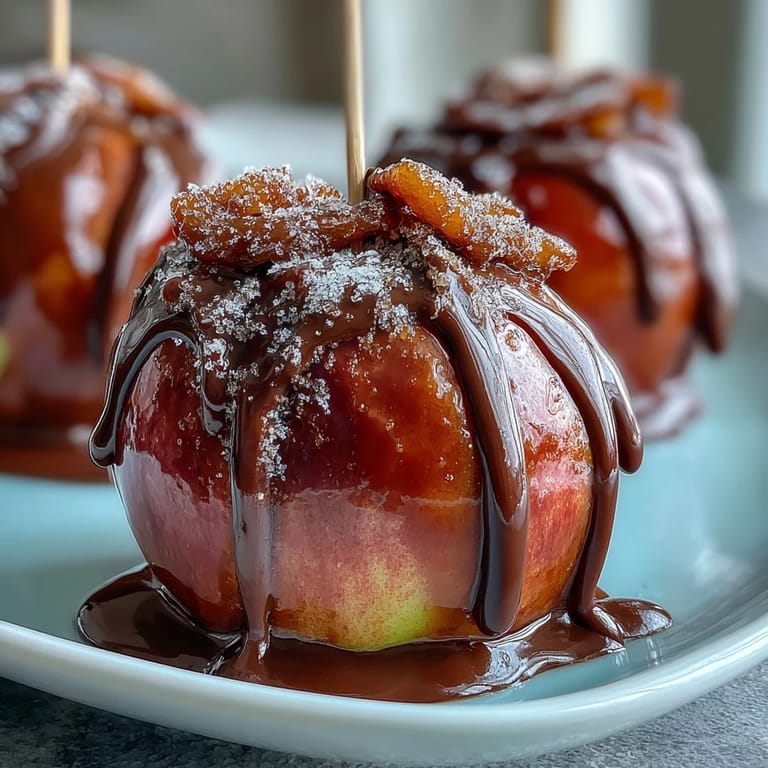
- Use a spoon or piping bag to create those elegant white chocolate lines across each apple, then set them down on your sheet again. Let everything set for another 10 minutes before you even think about serving.
 Save
Save There was this moment last November when my son came home from a friend's birthday party and asked if we could make candy apples together, not because they were special, but because we could sit at the kitchen counter and just talk while waiting for things to set. That's when I realized this recipe is about more than the final product—it's about having something to do with your hands while you're present with someone.
Why Temperature Control Changes Everything
The candy thermometer isn't just there to look official; it's genuinely the difference between a smooth, glossy coating and a grainy mess. I've tried eyeballing it, tried trusting my instincts, and every single time I skip the thermometer, I regret it within minutes. When the temperature is exactly right, the candy flows like silk and cools into that perfect crackling shell.
Apple Selection and Preparation
Choosing the right apples feels like a small thing, but it really shapes your whole experience. Granny Smiths are firmer and more reliable, holding their texture even as they absorb a tiny bit of moisture from the candy coating, while Galas give you a softer, sweeter bite that some people prefer. The drying part is non-negotiable, though—pat them down with a clean kitchen towel right before you start, because even a thin film of water disrupts the candy's adhesion.
Customization and Flavor Play
Once you understand the base technique, you can venture into variations that make the recipe feel entirely your own. I've rolled still-warm apples in chopped pistachios, crushed candy canes, and even finely chopped pretzels, which adds a salty crunch that balances the sugar beautifully. The white chocolate drizzle is a perfect canvas too—try adding a touch of extract like vanilla or almond if you want subtle depth, or stick with pure white chocolate for that clean, classic look.
- Nuts, sprinkles, or crushed candy need to be applied while the candy coating is still slightly tacky, so work within that 2 to 3 minute window after dipping.
- For a dairy-free version, substitute coconut or cashew-based white chocolate and you'll barely notice the difference.
- Store finished apples at room temperature away from humidity, and they'll stay perfect for up to three days in an airtight container.
 Save
Save These candy apples have this quiet way of turning an ordinary afternoon into something memorable, whether you're making them solo or with someone beside you. There's real joy in that crisp shell and that white chocolate drizzle, and honestly, that's all the reason you need.
Recipe FAQs
- → What type of apples work best?
Firm apples like Granny Smith or Gala are ideal for their tartness and sturdy texture, which hold up well to the candy coating process.
- → How do I know when the candy coating is ready?
The candy mixture should reach the hard crack stage at about 300°F (149°C), ensuring a crisp, glossy finish on each apple.
- → Can I substitute ingredients for dietary needs?
Yes, using vegan white chocolate allows for a dairy-free drizzle while maintaining a smooth texture.
- → What is the best way to get the white chocolate drizzle smooth?
Melting white chocolate with a small amount of coconut or vegetable oil in short microwave bursts helps achieve a creamy and pourable consistency.
- → How should I prepare apples before dipping?
Wash and thoroughly dry apples to ensure the candy coating adheres evenly and prevents cracking or bubbling.