 Save
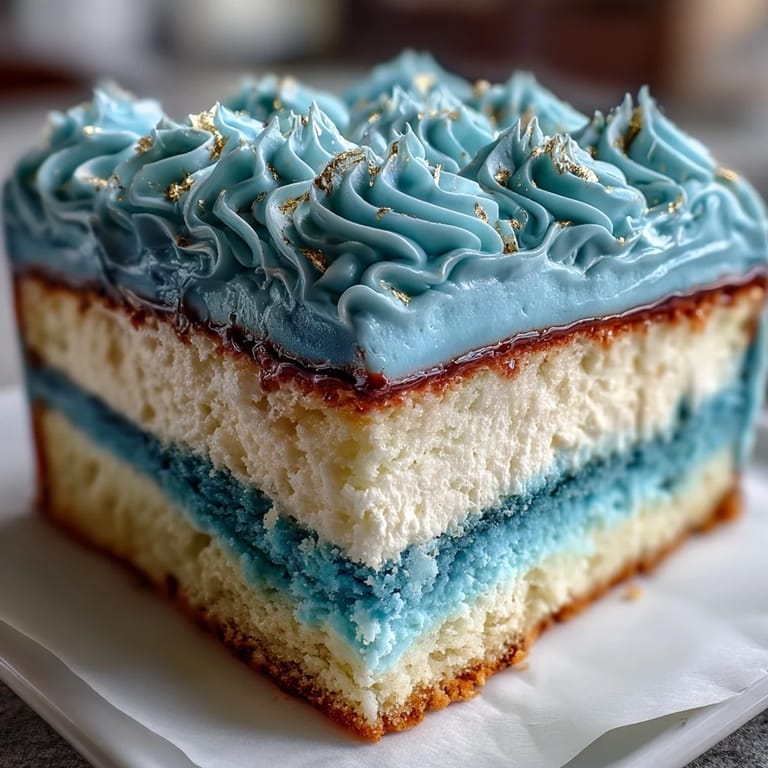
Save The afternoon I first attempted this graduation cake, the kitchen felt charged with anticipation: flour dust swirling in the sunlight and the sound of the electric mixer humming like an audience waiting for a reveal. While mixing the blue gels into the batter, I realized how coloring cakes is part art, part science—and the uncertainty made the result worth celebrating. As each shade deepened, my curiosity grew stronger—would the ombre hold its promise once baked? That moment of opening the oven and glimpsing freshly baked blue layers is what still sticks with me. It's more than just a cake; it felt like painting the milestone.
I once baked this cake for my cousin's graduation party—the ingredients lined up amidst laughter and steady background music. We joked about getting the blue tones right, and ended up with blue fingertips for days. Watching his friends dig in, some angling for the gold-topped edge or a lighter blue layer, made me realize just how much fun food adds to milestone moments. That memory made this recipe feel more like a tradition than a dessert. There's an unmistakable sense of accomplishment that comes with a cake this striking.
Ingredients
- All-purpose flour: Use sifted, high-quality flour for even texture; measuring by weight yields the most reliable results.
- Baking powder & baking soda: Make sure they're fresh for maximum lift—flat cakes are usually from old leaveners.
- Salt: Just a pinch sharpens the sweetness and enhances flavor depths.
- Unsalted butter: Room temperature butter creams better, which makes the cake tender and the buttercream smooth (don't rush the softening).
- Granulated sugar: Whipping sugar and butter thoroughly sets up a feather-light crumb; patience pays off.
- Eggs: Always crack eggs individually in a small bowl before adding to mix—nothing ruins momentum like a rogue shell.
- Pure vanilla extract: Real extract delivers a punch of aroma; skip the imitation for this milestone cake.
- Whole milk: Room temperature is crucial, or batter can seize and layers may bake unevenly.
- Blue gel food coloring: Gel types give deep color with minimal liquid; start lighter and deepen carefully for true ombre.
- Powdered sugar: Always sifted, it melts into the buttercream without lumps.
- Edible gold leaf/dust: Handle gently with tweezers or a soft brush—they tear easily but transform the cake into a centerpiece.
- Clear alcohol: Vodka or lemon extract helps gold dust adhere; use sparingly to avoid dripping.
Tired of Takeout? 🥡
Get 10 meals you can make faster than delivery arrives. Seriously.
One email. No spam. Unsubscribe anytime.
Instructions
- Start Your Prep:
- Preheat the oven and prep your cake pans—the parchment paper makes lifting each ombre layer a breeze.
- Mix Dry Ingredients:
- Whisk flour, baking powder, baking soda, and salt together until airy; the kitchen often smells nutty during this step.
- Cream Butter & Sugar:
- Beat butter and sugar until pale and fluffy, scraping the bowl often; you'll notice the peak in volume.
- Add Eggs & Vanilla:
- Stir in eggs one by one, watching the mixture stay smooth—vanilla gives the aroma of a classic celebration cake.
- Combine Wet and Dry:
- Alternate flour and milk additions, mixing gently; you'll feel the batter shift to velvety just before done.
- Color for Ombre:
- Divide batter into three bowls, tint each differently and stir until the hue matches your vision; embrace messy kitchen hands.
- Bake Layers:
- Pour into pans and level them; while they bake, the scent fills the room and anticipation builds.
- Cool Them Well:
- Cool layers in pans, then on racks—patience here keeps them from sticking or falling apart.
- Make Buttercream:
- Whip butter, add sifted sugar, vanilla, salt, and enough milk for creaminess; tint most of it deep blue for drama.
- Assemble the Layers:
- Level cakes if needed; layer darkest on bottom, with buttercream between, up to lightest on top.
- Crumb Coat:
- Apply a thin layer and chill briefly—this step seals in crumbs for a clean final look.
- Final Frost:
- Smooth the dark blue buttercream, blending in lighter shades if desired for ombre; a turntable helps but isn't required.
- Finish with Gold:
- Apply gold leaf or brush gold dust on edges—watch the cake transform in seconds.
- Chill Until Serving:
- Let the cake set and chill; this locks in the decorations and keeps the texture plush.
 Save
Save One graduation night, this cake sat in the center of the dessert table, steadily attracting everyone from grandparents to teens. The gold shimmer caught the candlelight, and someone quietly confessed they took a second slice just for the looks. Moments like this remind me that food can be a silent storyteller—conveying pride, joy, and accomplishment in every bite.
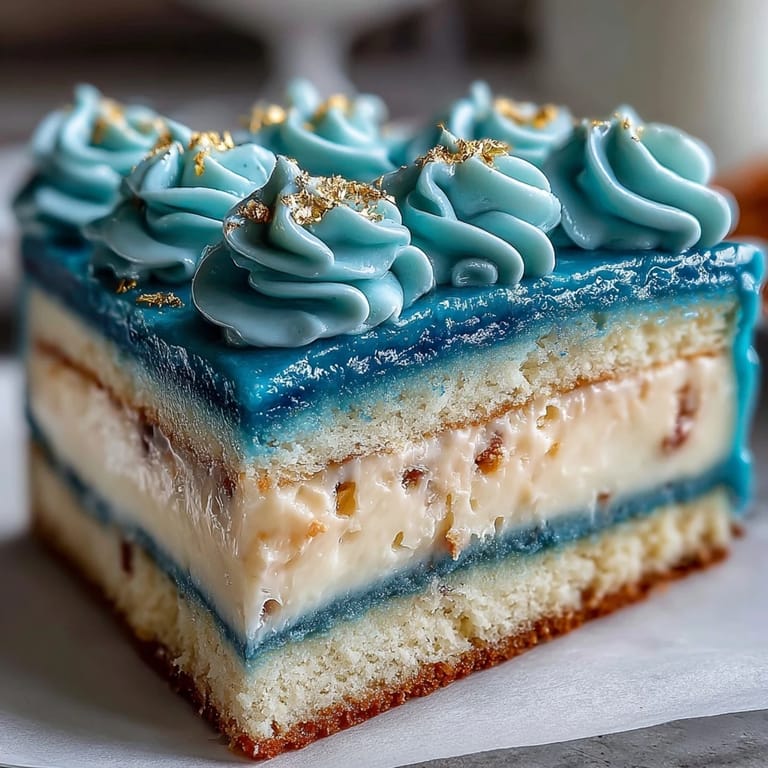
How to Achieve a Striking Ombre
Creating an ombre effect is about patience and a steady hand. Mix small batches of food coloring incrementally until you see distinct transitions. Blend edges gently for a seamless gradient, but don't overmix or colors can muddy. Keeping each bowl separate, I discovered over time that using a rubber spatula gives control without breaking the cake's structure.
Gold Accents That Wow the Crowd
Gold leaf can be tricky—use tweezers instead of fingers, and a soft paintbrush for dust. Don't crowd the cake; a few streaks or flecks create elegance without effort. Edible gold turns simple cake into a centerpiece, and the moment people see gold, they always smile or snap a photo. If you can't find gold leaf, edible gold dust mixed with alcohol achieves a similar effect.
Planning Ahead for Celebration Success
Give yourself extra time for cooling and decorating—rushing leads to smudged colors or melting gold. Assemble the cake before guests arrive so the ombre stays sharp. The layers improve overnight, so making the cake a day ahead actually helps.
- Carry cake layers carefully when stacking to avoid cracks.
- If buttercream feels too stiff, beat in a touch more milk one tablespoon at a time.
- Double check that your gold decorations are edible—not all are made for food.
 Save
Save Celebrate your graduate's milestone with a cake that embodies both artistry and pride. Share each slice and let the colors and shimmer start the conversation—making memories that last far beyond dessert.
Recipe FAQs
- → How is the ombre effect achieved?
The batter is divided and tinted with varying blue shades to create a gradient from light to dark blue throughout the layers.
- → What gives the cake its rich finish?
The cake uses a vanilla buttercream, tinted dark blue for smooth, creamy frosting, finished with edible gold decoration for elegance.
- → Can I add more layers for a dramatic look?
Yes, for a more dramatic ombre effect, increase to four or five layers with intensified blue shades as desired.
- → Are the gold decorations safe for consumption?
Ensure that gold leaf or dust used is labeled as edible and suitable for cake decorating.
- → What allergens are present?
The cake contains wheat (gluten), eggs, and milk (dairy). Always check gold decoration labels for additional allergens.
- → What tools are required for preparation?
You'll need three round cake pans, an electric mixer, mixing bowls, offset spatula, parchment paper, and optionally a cake turntable.